Tips for the Apex Calendar
Introduction
Apex Calendar region can be used to display the events in different views. The Calendar region is based on Full Calendar [1].
To use the calendar, we need to prepare a SQL query with the following columns [2]:
- Start Date: start date of the event. It can include the starting time.
- End Date: end date of the event.
- Display: event title to be displayed
- CSS style: the CSS style name for rendering the event title. The column is optional.
- ID: primary key for the event. The column becomes necessary if you want to add a link to edit the event in other pages [3].
- Other columns as the supplementary to the event title.
Here is an example:
1
2
3
4
5
6
7
8
9
10
11
12
13
14
15
select  order_id,   -- star date
        book_date,  -- end date
        scfo.employee_id ,  -- supplemental column
        room_code
        || ' '
        || sessions
        as display,   -- event title
       case sao.order_type
          when 'single_borrow' then 'apex-cal-green'
          when 'semester_borrow' then 'apex-cal-yellow'
          when 'semester_class' then 'apex-cal-white'
          else 'apex-cal-gray' end as css_class       -- css style for event title.
from sm_calendar_for_order scfo
     join sm_arrange_order sao on (scfo.order_id = sao.id)
/*
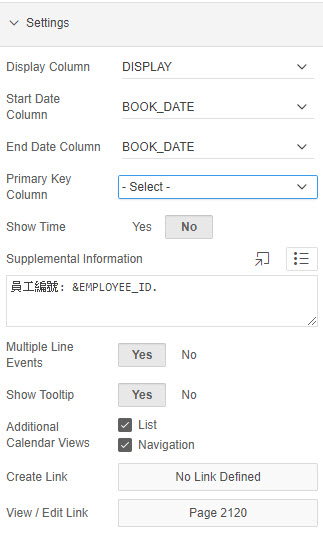
After the query has been prepared, we need to map these columns to Apex Column attributes. Navigate to the attributes of the Calendar region. You can find related attributes in the Settings section:

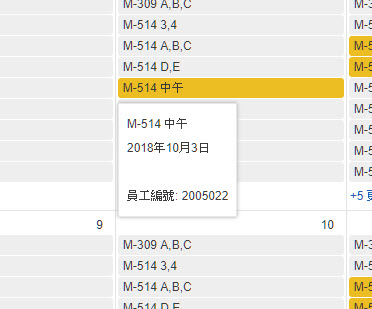
Add the supplemental information to event title
The supplemental Information field in the Settings section for the Apex Calendar allows us adding extra information to the event title when the Apex showing them on a popup window.


Modify the event title in the Apex Calendar region
We can use JS and dynamic actions to directly modify the event title shown in the Apex Calendar region if we do not want to modify the display column in the query for the Apex Calendar.
Steps:
Step Create the JS function.
function modify_event_title(){
 var $events = $('span.fc-title'); // Set of html elements
 var regexp_lt = /</g;
 var regexp_gt = />/g;
 var regexp_word = /[第節]/g;

 // Modify the texts of the event title
 $events.each(function(idx, element){
    element.innerHTML = element.innerHTML.replace(regexp_lt, '<').replace(regexp_gt, '>').replace(regexp_word, '');
 });

}
The event title is tagged by span.fc-title. The JS function finds all event titles and replaces texts using the regular expression.
Step Declare the JS function in the page.
Put the function declaration in the Function and Global Variable Declaration section of the page in which the Apex Calendar region resides.
Step Set the first time point to execute the JS function.
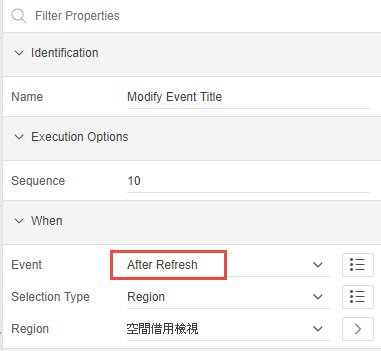
There are two time points to execute the JS function. The first time point is the After Refresh framework event for the Apex Calendar. Create a dynamic action triggered by event to run the above JS function.

We cannot execute the function when the page loads.
The calendar content has not been added to DOM of the page when the document is ready. Apex runs the AJAX plugin to execute the query for the calendar region after the page has been loaded. Therefor, locating the modify_event_title() JS code in the section of Execute when Page Loads in the page cannot successfully modify the event titles in the Apex Calendar.

Step Set the second time point to execute JS function.
The second time point is at switching back to the Month View from the List View by clicking the Month View button. The After Refresh framework event does not be triggered when the user switches from List View to Month View. So, Apex does not execute the modify_event_title function to modify the texts in the Month View. The user has to refresh the page to get the correct results.
Custom event comes to help!
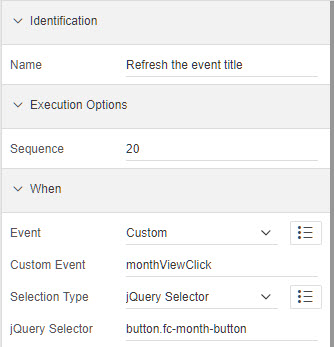
We raise a custom event when clicking the Month View button which is tagged by button.fc-month-button. the apex.event.trigger function is used to raise the custom event monthViewClick.
Put the following JS codes in the page section of Execute when Page Loads to raise the custom event handled by the dynamic action.
1
2
3
$('button.fc-month-button').on('click', function(){
    apex.event.trigger('button.fc-month-button', 'monthViewClick', this);
    console.log('Trigger the event');})
Create a dynamic action to handle the monthViewClick custom event to execute the JS function to modify the event title.

These are all the steps we need.
Summary
This article provides two tips for using the Apex Calendar. Firstly, extra columns can be added to the Supplemental attribute of the Apex Calendar to display the extra information to event title when showing in a popup window. Secondly, using JS codes to modify the event titles if we don’t want to modify the display column in the query for the Apex Calendar. There are two time points to run the JS codes to modify the event title. The first is the After Refresh framework which is triggered when the APEX has updated the Calendar. The second is when the user clicks the Month View button in the APEX calendar. A custom event is triggered when clicking the button and is handled by a dynamic action.