Unit 06 - 上傳及下載檔案
目標
- 瞭解如何上傳檔案儲存至 Server 端的指定目錄
- 瞭解如何產生動態連結, 下載檔案
知識
前端
當要使用 http post request 傳送檔案至 Server 時, 必須設定 form 的 encoding type 為 multipart/form-data,
表單的 enctype 屬性
1
2
<form enctype="multipart/form-data">
</form>
如果要讓使用者點擊連結後下載檔案, 可利用 <a> 的 download 屬性:
1
<a href="download_url" download="download_url"> Filename </a>
href 屬性的值建議和 download 的值一致. 如此, 使用者用滑鼠看到的連結內容才會和下載內容一致.
要產生前述的 anchor 標籤, 使用 <h:outputLink> facelet. 但 <h:outputLink> facelet 沒有支援 download 屬性.
此時, 使用 JSF 2.2 的 Pass-Through Attribute 的功能 [3]. JSF Runtime 不會處理 Pass-Through Attributes, 會原封不動的將此 attribute 輸出給 Browser.
底下的 <h:outputLink> 使用了 Pass-Through attribute:
1
2
3
4
5
6
7
8
9
<html xmlns="http://www.w3.org/1999/xhtml"
      xmlns:h="http://xmlns.jcp.org/jsf/html"
      xmlns:pt="http://xmlns.jcp.org/jsf/passthrough"
>
    <h:outputLink
            value="#{uploadBean.fileToDownload}"
            pt:download="#{uploadBean.fileToDownload}"> Download file: #{uploadBean.fileToDownload}
    </h:outputLink>
</html>
Render 的 HTML 為:
1
<a href="/jsf_unit06/files/me-pic-cartoon.jpg" download="/jsf_unit06/files/me-pic-cartoon.jpg"> Download </a>
後端
對應 URI 至 Server 的檔案目錄
Glassfish 上的 URI 結構為: http://server_name:port_number/app_context/page_uri. 必須將此 URI 對應到 Server 的檔案系統, 使用者才能點選連結後下載檔案. Server 的檔案系統對於 Glassfish 我們稱為外部目錄(External Directory).
在 glassfish-web.xml 中設定此外部目錄的對應. 新增一個 Alternate Document Root[4] 的 property, 將特定的 URI 或者 URI pattern 對應到某個目錄.
底下是這一次示範專案中的 Alternate Document Root 設定, /files 開頭的 URI 會對應到 c:\temp 的實體 OS 檔案目錄.
1
2
3
4
5
<glassfish-web-app>
    <!--<context-root>ImportPreprocessor</context-root>-->
    <parameter-encoding default-charset="UTF-8"/>
    <property name="alternatedocroot_1" value="from=/files/* dir=c:\temp" />
</glassfish-web-app>
取得上傳的 Part Object
當使用者透過表單提交 multipart/form-data POST request 時, 傳送過來的檔案會用 javax.servlet.http.Part instance 表示.
我們提供此物件, 取得上傳檔案的名稱或者取得檔案的輸入串流(Input Stream)[2].
取得上傳檔案的 Input Stream 物件:
1
InputStream is = file.getInputStream();
取得上傳的檔案名稱:
1
String inputFilename = file.getSubmittedFileName();
將 InputStream 的串流資料寫入到檔案系統
取得上傳檔案的輸入串流後, 使用 java.nio.file.Files 類別[5]的靜態方法, 將其寫入到 Server 端的檔案系統:
1
Files.copy(inputStreamObject, fullFilename, StandardCopyOption.REPLACE_EXISTING);
java.nio.file.Files 類別提供許多的方法對檔案或目錄進行操作, 如複製或刪除檔案.
取得目前應用程式的 Context
javax.faces.context.FacesContext [6] 處理單次 JSF Request時的相關單次請求靜態資訊(per-request state information). 透過此類別, 我們可以取得應用程式的 Context Path:
1
String appContext = FacesContext.getCurrentInstance().getExternalContext().getRequestContextPath();
User Story
- 使用者上傳一個檔案至伺服器端. 檔案存於伺服器的檔案目錄中(不是儲存於資料庫中)
- 系統更新頁面, 產生一個連結, 讓使用者下載先前上傳的檔案
實作程序
Step 設定 glassfish-web.xml, 將實體檔案路徑對應到 AP server 的 URI.
1
2
3
4
5
6
7
8
9
<!DOCTYPE glassfish-web-app PUBLIC "-//GlassFish.org//DTD
GlassFish Application Server 3.1 Servlet 3.0//EN"
        "http://glassfish.org/dtds/glassfish-web-app_3_0-1.dtd">
<glassfish-web-app>
    <!--<context-root>ImportPreprocessor</context-root>-->
    <parameter-encoding default-charset="UTF-8"/>
    <property name="alternatedocroot_1" value="from=/files/* dir=c:\temp" />

</glassfish-web-app>
Step 建立 JSF Managed Bean
1
2
3
4
5
6
7
8
9
10
11
12
13
14
15
16
17
18
19
20
21
22
23
24
25
26
27
28
29
30
31
32
33
34
35
36
37
38
39
40
41
42
43
44
45
46
47
48
49
50
51
52
53
54
55
56
57
58
59
60
61
62
63
64
65
package webbeans;

import javax.faces.context.FacesContext;
import javax.inject.Named;
import javax.servlet.http.Part;
import java.io.File;
import java.io.IOException;
import java.io.InputStream;
import java.io.Serializable;
import java.nio.file.Files;
import java.nio.file.StandardCopyOption;
import javax.enterprise.context.SessionScoped;

@Named(value="uploadBean")
@SessionScoped
public class UploadBean implements Serializable {
    private Part uploadPart;
    private String outputOSPath = "c:\\temp";
    private String outputURIPath = "/files";
    private String fileToDownload ="";

    public Part getUploadPart() {
        return uploadPart;
    }

    public void setUploadPart(Part uploadPart) {
        this.uploadPart = uploadPart;
    }


    public String getFileToDownload() {
        return fileToDownload;
    }

    public void setFileToDownload(String fileToDownload) {
        this.fileToDownload = fileToDownload;
    }

    /** Save file to the file system in the server-side.
     */
    public String uploadAction(){
        if (uploadPart == null)
            return null;
        // make the output filename to OS file system.
        String tgtfilename = outputOSPath + "\\" + uploadPart.getSubmittedFileName();

        //Get the input string from the Part Object
        try ( InputStream is = uploadPart.getInputStream()){
            // Create a File instance to get the abstract path.
            File tgtFile = new File(tgtfilename);
            // Write the input stream to file
            Files.copy(is, tgtFile.toPath(), StandardCopyOption.REPLACE_EXISTING);
        } catch (IOException e) {
            e.printStackTrace();
        }

        // Make the output file link
        String appContext = FacesContext.getCurrentInstance().getExternalContext().getRequestContextPath();
        fileToDownload = appContext + outputURIPath + "/" + uploadPart.getSubmittedFileName();


        return null; // Stay in the same page
    }
}
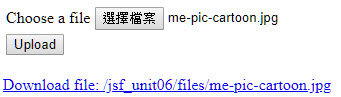
Step 建立 index.xhtm
<?xml version="1.0" encoding="UTF-8"?>
<!--
  Created by IntelliJ IDEA.
  User: user
  Date: 10/15/2018
  Time: 3:55 PM
-->
<!DOCTYPE html
        PUBLIC "-//W3C//DTD XHTML 1.0 Transitional//EN"
        "http://www.w3.org/TR/xhtml1/DTD/xhtml1-transitional.dtd">

<html xmlns="http://www.w3.org/1999/xhtml"
      xmlns:h="http://xmlns.jcp.org/jsf/html"
      xmlns:pt="http://xmlns.jcp.org/jsf/passthrough" xmlns:ui="http://xmlns.jcp.org/jsf/facelets"
>

<h:head>
    <title>JSF_UNIT06: Upload a file to server side</title>
</h:head>
    <h1>JSF_UNIT06: Upload a file to server side</h1>

<h:body>
    <h:form enctype="multipart/form-data">
        <h:panelGrid columns="2">
            <h:outputLabel for="selectFile">Choose a file</h:outputLabel>
            <h:inputFile id="selectFile" value="#{uploadBean.uploadPart}"/>
            <h:commandButton value="Upload" action="#{uploadBean.uploadAction}"/>
        </h:panelGrid>
    </h:form>
    <br />

    <ui:fragment rendered="#{not empty uploadBean.fileToDownload}">
        <h:outputLink
            value="#{uploadBean.fileToDownload}"
            pt:download="#{uploadBean.fileToDownload}"> Download file: #{uploadBean.fileToDownload}
        </h:outputLink>
    </ui:fragment>

</h:body>

</html>
複習問題
- 要從 Browser 上傳檔案到伺服器端,
<form>的屬性要做什麼額外的設定? - JSF facelet 中的 Pass-through attribute 的用途為何?
- 解釋 Glassfish 的 Alternate Document Root 的用途為何?
- 如何取得目前應用程式的 Context Path?
- 資源的 URL 結構為何?
- 那個類別提供方法讓我們對 OS 的檔案或目錄進行操作?
技術挑戰
PrimeFace 提供功能更多的檔案上傳元件 <p:fileUpload>[7]. 請修改程式, 使用 <p:fileUpload> 上傳單個檔案.
參考資料
[1] Map an external directory into Glassfish
[3] 8.9 HTML5-Friendly Markup - Java Platform, Enterprise Edition: The Java EE Tutorial (Release 7)
[4] Alternate Document Roots (Oracle GlassFish Server 3.0.1 Application Development Guide)
[5] Files (Java Platform SE 7 )