Unit 15 子路徑 (Child Route)
子路徑的應用
Angular 允許元件樣版有自己的路徑導向器出口 (router outlet), 換句話說根元件(root component)下的子元件也可以有 router outlet.
應用的例子。應用程式在 ProductDetail 的區域可以切換顯示 ProductDescription 或者 SellerInfo, 如下圖所示:
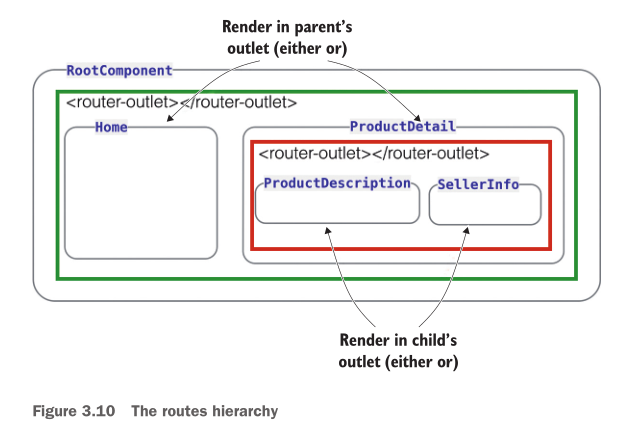
Fig Source: Fain, Y. and Mosieev, A., Angular Development with TypeScript 2nd Edition @ Amazon.com
顯示於 ProductDetail 的 router outlet 的路徑會附加在其上層RootComponent 的 router outlet 的路徑之後。
舉例來說, 假設顯示產品 123 的 ProductDetail 的路徑為 product/123;SellerInfo 元件的路徑為 seller/456。則SellerInfo 元件的完整路徑為product/123/seller/456。
子路徑的使用程序
在父元件樣版中加入 <router-outlet> 的標籤. 假若 FirstComponent 是我們的父元件, 則該元件的樣版為:
1
2
3
4
5
6
7
8
9
10
11
<h2>First Component</h2>

<nav>
  <ul>
    <li><a [routerLink]="['child-a', 0]">Child A</a></li>
    <li><a [routerLink]="['child-b', 1]">Child B</a></li>
  </ul>
</nav>

<!-- 父元件中的 router outlet -->
<router-outlet></router-outlet>
Source codes are from: Nesting Routes @ Angular
完成後, 設定父元件下的子路徑。在父元件的 Route 中使用 children?: Routes 特性設定子路徑所導向的元件樣版:
1
2
3
4
5
6
7
8
9
10
11
12
13
14
15
16
const routes: Routes = [
  {
    path: 'first-component',
    component: FirstComponent, // this is the component with the <router-outlet> in the template
    children: [
      {
        path: 'child-a/:id', // child route path
        component: ChildAComponent, // child route component that the router renders
      },
      {
        path: 'child-b/:id',
        component: ChildBComponent, // another child route component that the router renders
      },
    ],
  },
];
Source codes are from: Nesting Routes @ Angular
所以, 點選元件視域中的 Child A 連結, 結合所在父件的路徑所產生的整路徑為 first-component/child-a/0, 該路徑會導向 ChildAComponent 元件, 用該元件產生一個視域。點選元件視域中的 Child B 連結所產生的完成路徑為 first-component/child-b/1, 該路徑會導向 ChildBComponent 元件。
實作
操作案例
建立提供新聞快訊的服務器
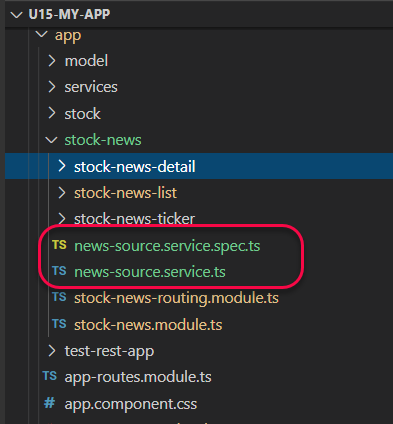
建立 NewsSourceService 服務器。
在 StockNewModule 中加入 NewsSourceService 服務器:
1
ng g service stock-news/NewSource
指令會在 StockNewModule 所在的目錄內新增服務器的檔案:
建立 News 介面。
在此服務器中建立 News 介面, 以規範快訊資料的結構:
1
2
3
4
export interface News {
  title: string,
  body: string
}
建立新聞快訊資料。
加入類別成員欄位 public newsList: News[]; 到服務器中, 並在建構子內初始化 newsList 欄位的資料。 完整的 NewsSourceService 服務器程式碼:
1
2
3
4
5
6
7
8
9
10
11
12
13
14
15
16
17
18
19
20
21
22
23
24
25
26
27
28
29
30
31
32
import { Injectable } from '@angular/core';

export interface News {
  title: string,
  body: string
}


@Injectable()
export class NewsSourceService {
  // 1. Added member field
  public newsList: News[];

  constructor() {
    // 2. Populate the data in the constructor
    this.newsList = [];
    this.newsList.push({
      title: "Officials face barrage of cyberthreats",
      body: "BACKBONE HACKED: ..."},
      {
        title: "Vietnam’s leaders look to Biden to offset rising China",
        body: "As officials in the Communist..."
      },
      {
        title: "Virus Outbreak: Nearly 3,000 in home isolation",
        body: "‘INCREASED VIGILANCE ..."
      }
    );

   }
}
顯示新聞快訊標題清單
注入 NewsSourceService 服務器到 StockNewsListComponent 元件。
我們要使用 StockNewsListComponent 顯示 NewsSourceService 服務器所提供的新聞快訊。所以, 需要注入 NewsSourceService 服務器, 注入點為該元件的建構子參數:
1
2
3
4
5
6
7
8
9
10
11
12
13
14
15
16
17
18
19
import { NewsSourceService } from './../news-source.service';
import { Component, OnInit } from '@angular/core';


@Component({
  selector: 'app-stock-news-list',
  templateUrl: './stock-news-list.component.html',
  styleUrls: ['./stock-news-list.component.css']
})
export class StockNewsListComponent implements OnInit {

  // 注入 `NewsSourceService` 服務器
  constructor(public newSource: NewsSourceService) {
   }

  ngOnInit(): void {
  }

}
使用 Flex-Layout 模組切割版面
StockNewListComponent 的樣版分成兩個顯示區域, 左邊顯示快訊標題, 右邊顯示快訊內容, 使用 Flex-Box 分割版面, 左邊和右邊縮放比例相同。
我們使用 Flex-Layout 模組提供的 flex-box directives 切割版面。
使用底下的指令在專案中安裝 Flex-Layout 模組:
1
npm i -s @angular/flex-layout @angular/cdk
安裝完成後, 匯入該模組到 StockNewsModule 特性模組中:
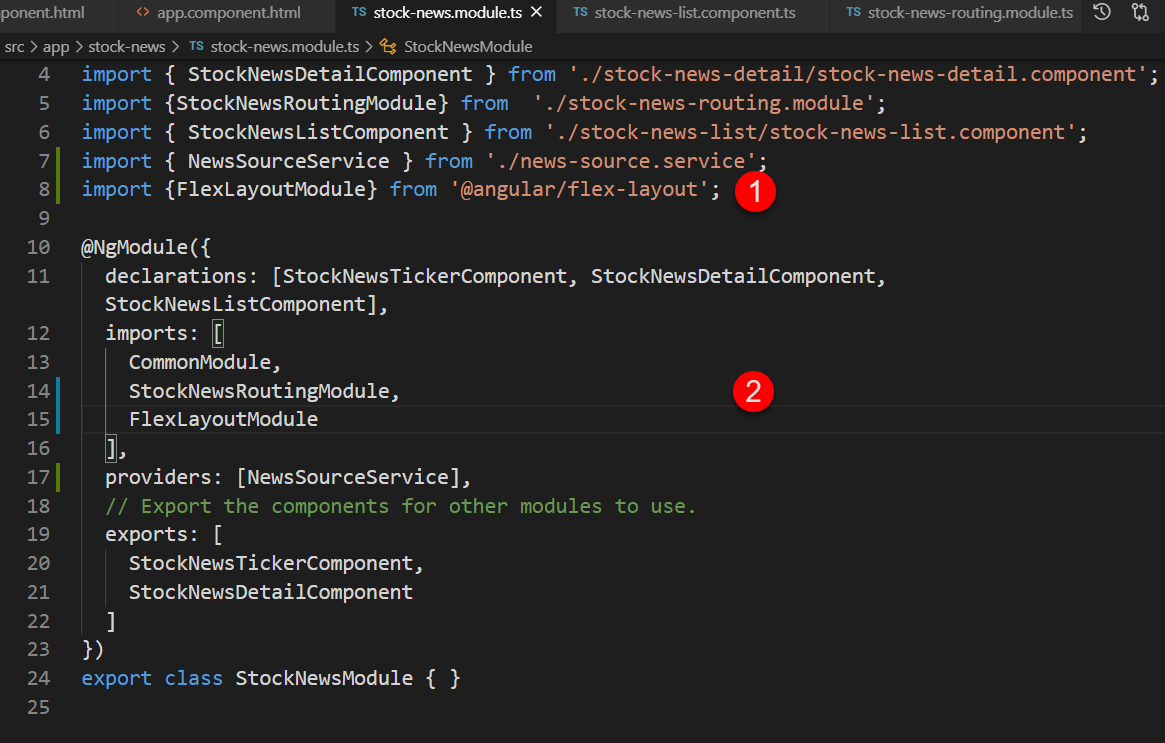
元件樣版設定
完成 Flex-Layout 模組的匯入後, 可設定 StockNewListComponent 的樣版版面:
- 在一般的情況下, 以 row 的方式顯示 flex-box 內的 flex-item, 每個 flex-item 佔螢幕寬度的 50%。
- 當螢幕寬度小於
sm時, 改用 column 的方式顯示, 每個 flex-item 的寬度為 100%.
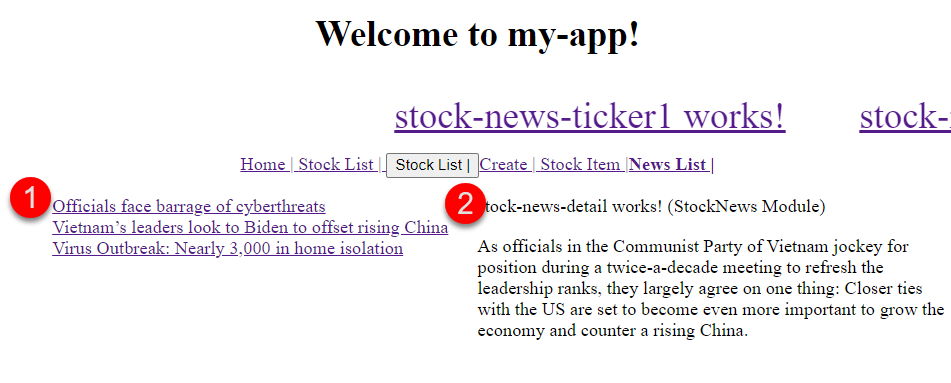
在左邊顯示的 div 區塊, 我們使用 *ngFor directive 動態的產生新聞快訊的標題。每個標題要加上導向路徑 detail/:id, 其中 :id 為快訊標題的索引值。
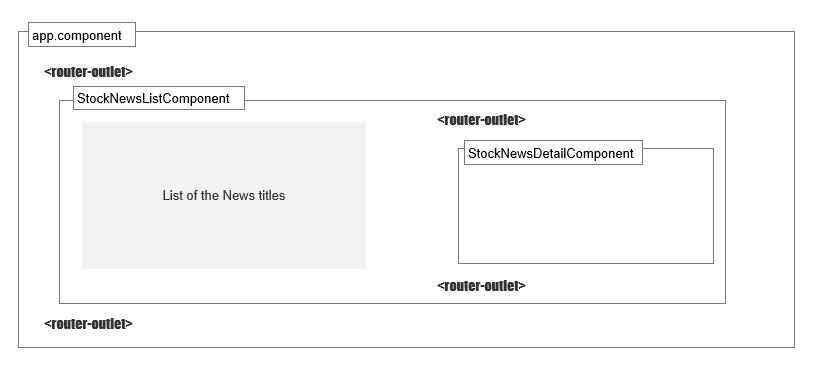
在右邊顯示的 div 區塊, 加入 <router-outlet>, 做為該元件的子路徑導向的出口。
StockNewListComponent元件的樣版如下:
1
2
3
4
5
6
7
8
9
10
11
12
13
14
15
16
17
18
19
20
<div fxLayout="row"
     fxLayout.lt-sm="column">
     <!-- 左邊顯示的 `div` 區塊  -->
    <div fxFlex="1 1 50%"
         fxFlex.fxLayout.lt-sm="100%"
         class="newsList">
        <ul>
            <li *ngFor="let news of newSource.newsList; index as idx">
                <a [routerLink]="['detail', idx ]"> </a>
            </li>
        </ul>
    </div>

    <!-- 在右邊顯示的 `div` 區塊  -->
    <div fxFlex="1 1 50%"
         fxFlex.fxLayout.lt-sm="100%"
         class="newsDetails">
        <router-outlet></router-outlet>
    </div>
</div>
有關 Flex-Layout API 進一步參考:
設定快訊標題內容的顯示子路徑
完成前述的設定後, 接著設定 StockNewsModule 特性模組內的導向路徑。
設定點選新聞快訊標題後顯示快訊內容的子路徑。
路徑 news/list 會在最上層的 <router-outlet> 顯示 StockNewsListComponent 元件的樣板。快訊內容是在 StockNewsListComponent 內的 <router-outlet> 顯示。所以, 在路徑 news/list 下使用 children 指定該路徑下的子路徑要顯示的元件:
1
2
3
4
5
6
7
8
const routes: Routes = [
    {path: 'news/detail/:id', component: StockNewsDetailComponent},
    {path: 'news/list',
     component: StockNewsListComponent,
     // 子路徑
     children: [{path: "detail/:id", component: StockNewsDetailComponent}]
    }
];
因此, StockNewsDetailComponent 的完整路徑為 news/list/detail/:id, 其中 :id 為路徑參數, 以區辨要顯示的是那個快訊標題的內容。
顯示快訊的內容
增加 content 成員變數到 StockNewsDetailComponent。
增加 content 成員變數到 StockNewsDetailComponent, 以便在樣版中動態顯示點選的新聞快訊的內容。
注入 NewsSourceService 及 ActivatedRoute 服務器到元件中。
元件的建構子參數中注入 NewsSourceService 以取得新聞快訊的內容。此外, 也要注入 ActivatedRoute 服務器, 以便後續取得路徑參數。
1
2
constructor(private newsSourceService: NewsSourceService,
    private activatedRoute: ActivatedRoute) { }
取得路徑參數並以參數決定快訊的內容。
點選快訊標題所產生的導向路徑為 news/list/detail/:id, 其中 :id 為路徑參數, 代表新聞快訊的編號。
我們將使用 Reactive Programming 的方式取得路徑參數。ActivatedRoute.paraMap:Observable<ParaMap> 特性提供 Observable 物件, 讓我們達到前述的目的。
在元件的 ngOnInit() 方法中加入以下的程式碼:
1
2
3
4
5
6
7
8
9
this.activatedRoute.paramMap
      .pipe(map(
              // get the id parameter
              (paramMap: ParamMap) => paramMap.get('id')
            ) // end map
      ) // end pipe
      .subscribe(
        (id) => { this.content = this.newsSourceService.newsList[id].body }
      )
這裡不能用 ActivatedRoute.snapshot: ActivatedRouteSnapshot 特性提供的路徑快照的方式取得路徑參數, 因為元件顯示後, 若只有改變路徑參數, Angular 不會更新快照的內容。因此, 當點選不同的快訊標題只改變 :id 路徑參數時, Angular 並不會改變快照的內容, 我們也無法取得更新的路徑參數。
完整的程式碼如下:
1
2
3
4
5
6
7
8
9
10
11
12
13
14
15
16
17
18
19
20
21
22
23
24
25
26
27
28
29
30
31
32
33
34
35
36
import { Component, OnInit } from '@angular/core';
import { ActivatedRoute, ParamMap } from '@angular/router';
import { NewsSourceService } from '../news-source.service';
import { map } from 'rxjs/operators';

@Component({
  selector: 'app-stock-news-detail',
  templateUrl: './stock-news-detail.component.html',
  styleUrls: ['./stock-news-detail.component.css']
})
export class StockNewsDetailComponent implements OnInit {

  // member
  public content: string;

  constructor(private newsSourceService: NewsSourceService,
    private activatedRoute: ActivatedRoute) { }

  ngOnInit(): void {
    /* Note: 這裡不能用 "路徑快照" 的方式取得路徑參數 */
    // const newsId = this.activatedRoute.snapshot.paramMap.get("id");
    // console.log('newsId', newsId);
    // this.content = (this.newsSourceService.newsDetails[newsId] as NewsSource).body

    // 使用 Reactive Programming 的方式取得動態的路徑參數
    this.activatedRoute.paramMap
      .pipe(map(
              // get the id parameter
              (paramMap: ParamMap) => paramMap.get('id')
            ) // end map
      ) // end pipe
      .subscribe(
        (id) => { this.content = this.newsSourceService.newsList[id].body }
      )
  }
}
在 StockNewsDetailComponent 的樣版中顯示快訊內容。
在 StockNewsDetailComponent 的樣版中加入以下的程式碼, 顯示 元件的 content特性值:
1
<p></p>
完成。